Learn how to install MySQL 8.0 on CentOS 8 and Oracle Linux 8 with step-by-step instructions for database and Linux administrators.
MySQL 8.0 is one of the most powerful and widely used open-source relational database management systems (RDBMS) for enterprise and cloud-based applications. With its enhanced performance, security improvements, and advanced features, MySQL 8.0 is a preferred choice for database administrators (DBAs) and Linux system administrators managing critical applications.
If you’re working with CentOS 8 or Oracle Linux 8, installing MySQL 8.0 correctly is essential for ensuring stability, security, and high availability in your production environment. Whether you’re setting up a new database server or upgrading from an older version, understanding the right installation steps can help you avoid compatibility issues and optimize database performance.
In this comprehensive guide, we’ll walk you through the entire installation process of MySQL 8.0 on CentOS 8 and Oracle Linux 8. We’ll cover repository setup, installation commands, initial configurations, and essential post-installation tasks to get your database up and running efficiently. By the end of this tutorial, you’ll have a fully functional MySQL 8.0 instance ready to power your critical applications.
What is MySQL 8 and How Does It Compare To Previous Versions?
MySQL 8 offers a wide range of features that make it easier for developers to build and manage databases. Compared to previous versions, MySQL 8 comes with improved scalability, better performance, and enhanced security features. In addition, it has been designed to be more user-friendly and efficient in terms of use cases.
How to Install MySQL 8.0 on Linux
Installing MySQL 8.0 on Linux is a fairly simple process. In this article, we will walk you through the steps required to install MySQL 8.0 on CentOS 8/Oracle Linux 8
1. Install MySQL :
# dnf module -y install mysql:8.0
2. Configure MySQL Database, set default charaset :
# vim /etc/my.cnf.d/mysql-server.cnf
Add the following line under “[mysqld]”
[mysqld]
character-set-server=utf8mb4
Save the changes.
3. Start MySQL and make it auto start at boot with below command :
# systemctl enable --now mysqld
4. Allow to access MySQL Server from remote Hosts, allow service
# firewall-cmd --add-service=mysql --permanent
# firewall-cmd --reload
5. Secure and run initial settings for MySQL. Read on How to Secure MySQL/MariaDB Database Server :
# mysql_secure_installation
Output
# mysql_secure_installation

Securing the MySQL server deployment.

Connecting to MySQL using a blank password.

VALIDATE PASSWORD COMPONENT can be used to test passwords
and improve security. It checks the strength of password
and allows the users to set only those passwords which are
secure enough. Would you like to setup VALIDATE PASSWORD component?

Press y|Y for Yes, any other key for No: y


There are three levels of password validation policy:

LOW    Length >= 8
MEDIUM Length >= 8, numeric, mixed case, and special characters
STRONG Length >= 8, numeric, mixed case, special characters and dictionary                  file

Please enter 0 = LOW, 1 = MEDIUM and 2 = STRONG:
Invalid option provided.

There are three levels of password validation policy:

LOW    Length >= 8
MEDIUM Length >= 8, numeric, mixed case, and special characters
STRONG Length >= 8, numeric, mixed case, special characters and dictionary                  file

Please enter 0 = LOW, 1 = MEDIUM and 2 = STRONG: 0
Please set the password for root here.

New password:

Re-enter new password:

Estimated strength of the password: 50
Do you wish to continue with the password provided?(Press y|Y for Yes, any other key for No) : y
By default, a MySQL installation has an anonymous user,
allowing anyone to log into MySQL without having to have
a user account created for them. This is intended only for
testing, and to make the installation go a bit smoother.
You should remove them before moving into a production
environment.

Remove anonymous users? (Press y|Y for Yes, any other key for No) : y
Success.


Normally, root should only be allowed to connect from
'localhost'. This ensures that someone cannot guess at
the root password from the network.

Disallow root login remotely? (Press y|Y for Yes, any other key for No) : y
Success.

By default, MySQL comes with a database named 'test' that
anyone can access. This is also intended only for testing,
and should be removed before moving into a production
environment.


Remove test database and access to it? (Press y|Y for Yes, any other key for No) : y
 - Dropping test database...
Success.

 - Removing privileges on test database...
Success.

Reloading the privilege tables will ensure that all changes
made so far will take effect immediately.

Reload privilege tables now? (Press y|Y for Yes, any other key for No) : y
Success.

All done!
6. Verify MySQL root login :
# mysql -u root -p
Example of successful login :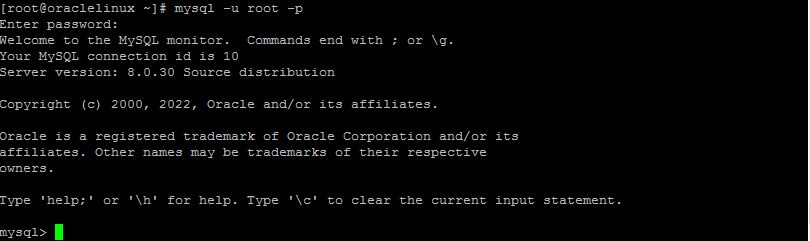
Conclusion:
Installing MySQL 8.0 on CentOS 8 and Oracle Linux 8 is a straightforward process, but following the correct steps ensures a smooth and optimized setup. By using the official MySQL repository, configuring authentication settings, and securing your installation, you can build a reliable database environment for your enterprise applications.
As a database administrator or Linux administrator, mastering MySQL 8.0 allows you to enhance database performance, improve security, and ensure high availability for critical workloads. Whether you’re deploying MySQL for a new project or upgrading an existing system, staying up to date with MySQL’s latest features and best practices is crucial for efficient database management.
Now that you’ve successfully installed MySQL 8.0, consider exploring advanced topics like performance tuning, replication, and backup strategies to further strengthen your MySQL deployment. If you found this guide helpful, share it with your network and keep learning to become an expert in MySQL database administration.